Tuesday, April 24, 2018

eMission Control, We Have a Problem

The registration on the MGB runs out in May, so I need to get it through smog testing soon. Today's post covers the discoveries made.

How Works MGB Emission Controls
"the 70's were an interesting time". I find myself saying that any time I look at a building or house constructed in the 1970's. They're just weird. There are strange angles, funky roof lines, sunken rooms and simply unfurnish-able spaces. This experimental period was also the when the first attempts at vehicle emission controls took place in the US. Some of the ideas were decent, took hold and persist in some form today. Others were just strange, and I wonder if they really did anything at all. So today we look at the MGB, circa 1978. When this little car was built, emission controls were mandatory, unleaded gas was prevalent and even now cars this old still need to pass emissions standards in highly populated areas in Oregon.

By 1978, they had figured out that venting crankcase pressure to the atmosphere was bad, so the PCV (positive crankcase valve) idea was born. In the MGB, this takes the form of a hose running from the case to the air cleaner. This is item #57 in the MossMotors image to the right. The oily air gets burned during combustion. By this time, they had also figured out that gas fumes from the fuel tank (and carb) shouldn't vent to the atmosphere, so these gasses are routed to the valve cover (hose #70) to get sucked into the engine while it's running or they settle into the charcoal in a special canister (#60) designed for this.

The 1978 MGB was fitted with a catalytic converter (cat) in the exhaust piping. This simply uses the heat of the exhaust to get really hot and burn off any unburnt fuel that passes into the exhaust. These reduce the hydrocarbons in your exhaust and an emissions failure for "HC" is probably because your cat is failing. Some folks swear by the CRC "guaranteed to pass" fuel additive to effectively clean your cat for a short term, allowing you to pass emissions. This feels a little like cheating, but if it is just to keep you clean long enough to save the cabbage to buy a replacement cat, maybe it's not.

Last, there's the smog pump system. This thing runs on a belt, and effectively pushes filtered air into the exhaust while the engine is running. If you think about it for a minute, this effectively was designed to fool the emissions tests by diluting the amount of pollutants running out the exhaust with fresh air. How this got past the fed's, I don't know.

Missing in Action
When I got my MGB, I really didn't know much about them or what to look for under the hood. Turns out, there aren't emission test needed for cars owned and registered outside a certain seemingly arbitrary line around the greater metropolitan area. The seller lived outside the line, so he made modifications that aligned with his lack of emissions test adherence. These modifications weren't apparent to me until after I got the "B" home, and was well into the front-end tear-down effort last winter.

So, what's missing? Well... all of the under-the-hood stuff. There's no smog pump, nor gulp valve, connecting hoses nor even an access point in the exhaust manifold. The (oil breather) hose that is supposed to run from the crankcase to the air cleaner is missing and there is no facility for a hose to fit in the air cleaner had the hose been present. The vent line from the gas tank ends unceremoniously next to a bracket that should be holding the charcoal canister which is also missing. In all fairness to the prior owner, I think I lost the charcoal canister. The carb set up was changed so there is no vent coming off the float-bowl. At least I have a catalytic converter. Or, at least it looks like one. It doesn't look like the stock one, so it may not be terribly effective.

What to Do?
Looking at all of the missing, I still need to pass this test or I will have a very spendy undriveable car. I started with the most obvious: get a charcoal canister and hook up what I can to it. Bottom line, if the Department of Environmental Services (DEQ) person can smell gas, you fail before they start. So, I bought a used one off eBarf. Next, I'm going to run route the oil breather into the air cleaner somehow. Then, I'll do a full tune-up: oil change with filter, clean the steel mesh air filter, new spark plugs, wires, dizzy cap and rotor. My challenge will be getting a tank of fuel with the CRC stuff through the engine during the rainy season without a convertible top. First things first: fit the charcoal canister, do the oil breather and tune-up.

That's it for today. I welcome ideas for how to get through the DEQ so I can keep this car moving forward with an eye for playing this summer. I'll post a follow-up on what I did and how the DEQ folks responded. Thanks, as always for following along-

Tuesday, April 17, 2018

Vinegar and Baking Soda

Quick post today. C, T and I have been looking for a cheap and viable cleaner for our car projects. This mini-post looks at using a vinegar and baking soda combo as an all-purpose deep cleaner.

Starting Point
So much of our time working on our projects isn't the fun sexy part of removing parts or putting new parts in, or even really fun stuff like welding. At least half of our time is cleaning stuff. Those car-fix TV shows don't film or broadcast that, because it's really not interesting. And viewers would change the channel. But, cleaning is so important and so central to everything we do. In retrospect, I've done a horrible job of highlighting this along the way, falling into the same trap of "not interesting" for readers. So, today, I'm doing a tiny post on the topic.

We usually go the route of dish-soap, glass cleaner, de-greaser, goof-off or brake cleaner depending on what we're cleaning. Ultimately, the real work is scrubbing or rubbing by hand with shop towels, sponges, paper towels and maybe steel wool. Our first priority is to not damage the part, and so that sometimes means we leave it not quite as clean as we would want it to be. We are always looking for new cleansers that do the job, do it well and preferably do it without a big negative impact on the environment (which is why we try to avoid brake cleaner).

The Impetus
before. at night w/flash camera
The new A4 had been parked for at least a year when we picked it up. The PO said it was much shorter, but unless he was just driving it up and down his driveway, he was driving it without tags. So, we're pretty sure it sat longer. Anyway, the Pacific Northwest has lots of things it is famous for. Not on the list is the amount of moss that grows here on pretty much anything that sits still during the rainy season. Even pure and perfect paint will have a dull green haze come summer, if it hasn't been cleaned or even just moved during the rains. Putting the A4 non-movement with that non-published reality nets us an A4 that had itself some green haze. This green haze was especially bad on the headlights, reducing their usefulness. T thought they were scratched. Having no money and no special headlight de-scratcher tooling, we hit the internet for cheap home-grown alternatives.

Headlight de-Hazing
We came upon a YouTube of a guy fixing his headlights with vinegar and baking soda. I had heard of this combination as a recommendation for cleaning carpets, and intended to attack the keeperZed carpets once we got that far. But I hadn't heard of using vinegar/soda for getting scratches out of glass. Feeling unconvinced, T mixed up a small paste in a glass dish and grabbed a microfiber cloth. First, he shot the headlight with window cleaner and wiped it "clean" with a paper towel. Then, he dipped the microfiber cloth into the paste, wiped it on and rubbed it off. Seriously, that's all he did. Then, he rinsed with another window cleaner spray and wipe to make sure there wasn't any paste residue left.

after. next day no flash
The results are pretty amazing. We aren't entirely sure if the headlights were really scratched up or just covered in mossy haze or just hazey from age. They look much better now and the light shines through them much better than before. Total cost: virtually $0. I had leftover dollar-store apple vinegar from when I cleaned the radiator in the MGB (See that MGB Coolant Pump Replacement (Part 2)). We had an open box of baking soda in the fridge. Put together with about 10 minutes of clock start-to-end, and the A4 went from hazey, ineffective and unattractive headlights to clear and bright headlights.

During the radiator experiment, I used baking soda and vinegar separately: one to neutralize the other. When used together, they froth like mad. Based on my reading, it is this frothing / oxidizing action that does the cleaning. I've read that you can mix in some lemon or orange dish soap into the mixture to leave a fresh smell (not vinegar) behind. C experimented with that when he started looking at the carpets in the 280ZX.

Carpet Deum
C arrived with a great energy and interest in getting his carpets cleaned on the 280ZX. We had finished pulling parts off the donor, but hadn't yet dealt with the carcass. The renewed energy was very welcomed, and he wanted to focus it on the parts pile that was now overwhelming the keeper Zed. On the top of the heap was the carpet. In the ZX, the carpet is extremely simple: there are 2 pieces, one for the cockpit from the back of the seats to under the dash and one piece for the trunk space. With the newly learned lessons with the headlights, he grabbed the dollar-store vinegar and the commercial-grade soda from the blasting and started in on the rear carpet.

All in, he spent about 30 minutes working on it. He poured soda onto a section of carpet, spreading it around with his hands. Then, he spread lemon dishsoap in a wavy thin line across the same area. Last, he took a bottle of tonic water in one hand and a bottle of vinegar in the other and poured fluids on top, creating a thin lather. Once the lathering action started to slow, he attacked the area with a plastic scrub-brush. Once scrubbed, he let it sit and moved on to another area. Each section got no more than 5 minutes of attention. When he had done enough of the carpet for his experiment, he let it sit for an hour while we ate dinner. After dinner, he grabbed the garden hose, put a standard tip on it and hosed off the carpet.

The results were pretty amazing. While it didn't come clean like it was factory-new, it does look like it was a very well cared for carpet. He will be doing the rest of that section as well as the front carpet so he can re-use them in his keeper Zed. Now that we've proven it works, I'll be trying it on the interior hard plastic in the MGB... maybe the tail lights.. who knows?

That's it for today. Thanks, as always, for following along-

Tuesday, April 10, 2018

MGB - floor pans (Part 4)

When I completed the last segment of the floor pans (MGB - floor pans (Part 3)), I mentioned that I was going to get some seam sealer and some paint on the floors, and that it may not warrant another posting. Well... now that it's been a few months, I think maybe it is.

Seal the Seams
Seam sealer is this sticky black goop that makes sure the seams are weather sealed. I guess that's kind of obvious. Anyway, it comes in a caulking tube and is applied like caulk around a window in your house. Except its not that easy. And you're probably outside. And you're all scrunched into some crazy twisted body contortion because getting the tip of a caulking gun against the underside of a little British sports car is virtually impossible without a lift. Like caulk, you need to press it into the seam with the tip of your (gloved?) finger, and make sure the edges are tapered down so there's not a spot for water to collect. I did this on both the underside and the topside of the floors. It was actually kinda fun.

Flex Seal
You've seen the commercials. "I cut my boat in half!" he cries as he completes the cut from stem to stern with a cut-off wheel on an angle grinder. In an older advert he replaced the bottom of his boat with a screen door, painted it with some clear stuff and then by the end of the ad he's paddling around while sitting on a screen door. Yeah, that's pretty crazy, but the picture here shows it. I thought I'd experiment with it, since I guess that's what I do. So, once the seam sealer dried, I got a quart of the black Flex Seal and painted the edges and then the floors and then up the sides of the MGB tub. I made sure to keep the drains cleared, and the areas around the plastic plug-pulls cleared as well. I wondered if it would meaningfully change the amount of noise. I found that banging on the floor with my knuckle before and after did see a reduction of around 10dB. From that, I've concluded that it would suppress the noise from a rock hitting the underside. All of the interweb sites dealing with noise reduction insist that the noise associated with vibration is a very special animal not to be caged by simple things like a rubber-y paint. Okay fine. I tried it anyway and there are noise reducers in paint form now too, so I don't know what to make of that. I guess the interweb can't agree on it.

Sound Deadener
Once the Flex Seal paint was dry, I thought I'd go after the traditional asphalt, rubber or butyl sound deadener. I've used a couple different things before, and had leftovers of both. The foil-backed stuff costs more than the plain rubber-ish mats available from McMaster-Carr, but back when I experimented with them before, I couldn't really tell how well they worked because I didn't have a decibel tester. This time, I put the McMaster-Carr stuff on the big open spaces in the trunk, and tried the knuckle banging test. It didn't deaden the sound nearly as much as I expected. If memory serves, it was within the margin of error for my inconsistent banging force. Same went for putting the foil-backed stuff on the floor of the cabin. But then I noticed something: the foil backed stuff wasn't really sticking to the Flex Seal. Grr.. Piece by piece the foil-backed, expensive sound deadener lifted off the floor, no longer sticky. I decided I didn't want to deal with it right then. So, I installed the seats and moved onto other things for the winter.


Paint Again
Now, many months later, I'm back with some time and interest in the little car. I've spent many weeks clowning with rims and stripping parts of a 280ZX, so I'm ready for something a little more satisfying. I have a bunch of interior bits and a new convertible top on order from the UK, so I figured I better get the steel and noise containment solved. Knowing that the noise reduction won't stick to the Flex Seal, I concluded that a coat of regular paint on top of the Flex Seal might work. In my gut, this felt like putting lipstick on a pig or just throwing darts in the dark. Still, the thinking was that if regular paint gripped the Flex Seal and the noise reducer sticks to the regular paint, then it worked. Of course, will the noise reducer actually work? First, let's get the paint and the deadener on there, eh? For paint, I used some black paint I had in a touchup can. As described by the Flex Seal folks, the paint adhered very well. In retrospect, the problem could have been that the old noise deadener was just that: old. Maybe it didn't stick because it's stickiness had dried out or faded over time.

Deaden Again
Since I was effectively out of the 2 kinds of sound deadener, and I wasn't terribly impressed with their noise reduction anyway, I bought a third kind: Noico 80 mil butyl automotive sound deadener. With a focus on just doing the parts of the car that were going to be covered with carpet, I bought 18 square feet, their smallest ship-able size. I eventually will want to cover more area, like inside the doors, but I'm not going to do new door cards yet, so why make this project any bigger than it already is? I'm not sure this is the right stuff for under the hood (the manufacturer, of course, says it's great anywhere that doesn't get super-duper hot like a muffler), so I'll probably do a test-stick of a small piece to see how it handles the heat and vibrations under there.

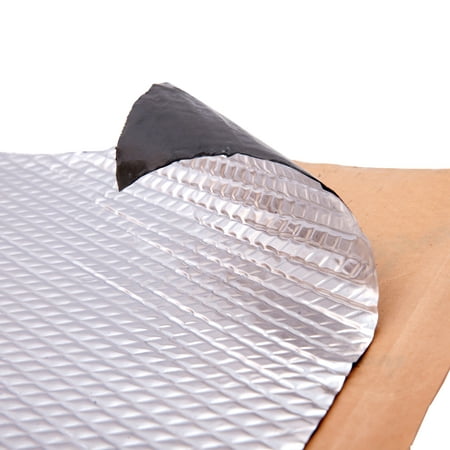
For the tub, though, it gripped very well. In my usual experimental fashion, I didn't paint over the top of all of the Flex Seal. In some of those other areas, I lightly sanded with 220 grit sandpaper and in others I left it just as it was. The butyl stuff I bought was a little different in that it had diamond embossing (see picture). The directions indicated that an area installation was complete when the diamonds had been pressed flat, preferably with a roller. I hadn't a roller. I looked at Harbor Freight and they didn't have one. I could order one online for $12US or more, but then I'd have to wait for it to arrive. So... I tried some other things I did have in the garage.... and one from the kitchen.

Sticky Tuna
I found 2 tools were very effective at getting the butyl to adhere and the diamonds to flatten out. First, I used a can of tuna. Yeah, that's right. It's round and flat like a hockey puck, so it was able to flatten the bigger areas pretty quickly. For pressing on edges and tight spots, I used the plastic handles on the scissors I was using otherwise to cut the sections. I didn't do other things exactly like the directions either. For example, the manufacturer (and the interweb) say to draw a template on paper and then translate that template onto the paper-backing of the sound deadener. That's a lot of time and paper. Instead, I used a sheet of aluminum foil over and over again. I would take the piece, press it into the spot where I want the material to go and then drag my fingernail along the edges. I would then transfer that edge to the backing, cut and apply. For applying, it is recommended to pull the paper as you install, and I followed that advice. I also followed the advice of cleaning the area with a degreaser (I'd cleaned these spots so many times, I just used window cleaner as a final check) before fitting deadener. Even with the foil time-saver, this is quite time consuming even on a little car. I spent over 4 hours and got 2/3 of the driver side done and about 1/3 of the passenger side before I ran out of material. Of course, getting down behind the pedals on this thing takes some doing, so there's time lost there. I expect the trunk will be much faster.

I'm waiting for more material, and I'll be finishing up the floors once it arrives. After that, it's carpet pad and carpet, unless I discover something else that needs to be done to the floors first. I really can't imagine anything, but I'll continue this thread if it does. Otherwise, that's it for today. Thanks ,as always, for following along-

Apologies for the post-fail where an early draft of a future posting got released. That post (about replacing the radiator in the TDI-powered microbus) will appear later on, once I've re-written it a few times.

Tuesday, April 3, 2018

Bye Jaws, Hello A4

Our stable of cars has had a small change. Today's post covers that, and the fun a new car brought with it.

Bye Jaws
Jaws
I didn't really post much about the '87 Jeep Cherokee, except during a complaint about having too many cars (See Oh Clutch). Jaws was T's daily driver, transporting him back and forth from home to Reno Nevada and back multiple times, back and forth to Sacramento, the mountain and his job for over a year. He poured plenty of money and love into that Cherokee. Brakes and oil, like any other car, of course were changed. He also replaced the clutch, and I replaced the rear window. He installed a bluetooth stereo and other creature comforts. In the end, though, he didn't want to put any more money into it, and at over 330k miles, I can't say I blame him. Within a couple days of posting on craigslist, he had multiple respondents and he sold it off.

Our A4 History
T's first car was an A4. It was a 2.7L non-turbo, but he loved it from the day he bought it (See Gotta Keep Moving). The guy he bought it from was the original owner and he babied it. Unfortunately, the timing belt needed to be done (see Planning Winter Break), but that wasn't obvious until much later. He got a stereo earlier and had it butchered by Car Toys (see Flash Gets Sounds), but moved it into the A4. Ultimately, he decided he wanted something different, and traded it for a Subaru. The guy with the subbie said he was an Audi guy, but ultimately, the trade may not have been a very good deal for either of them. We saw the A4 back on craigslist a few months later with a blown engine, so we guessed that the "Audi guy" didn't heed the warnings about doing the timing belt immediately. The Subbie got broken into in Reno and totalled by the insurance company so neither car fared especially well. T did learn some things through the ownership of both cars, so, maybe it wasn't all bad.

Hello A4
the 2.7L at purchase
This brings us to the newest member of the herd. Once Jaws was gone, T drove Dude (our 2000 Saturn) to work while he saved up some money. He wanted a black A4 again. He found one without having to look for too long. Same make/model/year as his old one, but the new one has a 1.8L turbo and a deep brown leather interior. So nice. T is the third owner, and while it has higher miles than the last one (225k), it has lots of fancy bits like an upgraded suspension and a bigger exhaust. It needed a timing belt done, had a really bad coolant leak from the pump and has a leaking power steering system. Of the issues, the timing belt and cooling pump were most immediate. T bought it and had it delivered on a wrecker on a Friday night. T and I attacked the coolant pump and timing belt the following morning.

Timing Belt Discoveries
We shied away from the 2.7 timing belt job a couple years ago because it was a dual-overhead cam. Keeping everything aligned and getting the belt on correctly with 3 gears (2 cams, plus crank) felt too big. Yeah, we got a-scared and begged off. T wanted a different car anyway, or so he thought. Anyway, one cam felt do-able.

We followed internet directions, but there were things that we discovered that were unexpected. For instance, I was really surprised how easily everything came apart. Seriously, after working on VW's, I expected the Audi to be equally difficult with a gazillion different fastener types and weird tools needed. Nope. We needed a big Allen key for the large serpentine gear on the end of the crankshaft and Torx for getting the front radiator / core support and a few other things off. Otherwise, it was pretty common hex nut/bolts. The internet directions were spot-on. I'll find and share the link. We suffered no rust, but there were a couple fasteners that were torqued on so tight, we needed to solve for a breaker bar. For example, those Allen bolts holding the serpentine belt gear. We took the pipe that is used on the floor jack and slid it around the Allen key. That allowed for a smooth application of force, and the bolts released without stripping.

Zoom Zoom
After a Saturday of pulling it apart and starting to put it back together, we spent a few hours on Sunday finishing the put-together. To be fair, T did almost all of the work while I continued the tear-down of the donorZed. Still, the timing belt parts fit cleanly, and after flushing the cooling system we were ready to test fire. It started right up. Seriously, it started like it hadn't sat for 6 months and then gotten towed and a timing belt service. The aftermarket exhaust gives it a nice low growl. So, after a very short test drive where a charged-air hose popped off, the rest of the front end was put together and T took a longer, more spirited test run. In his words... "that thing can pull!" Clearly, he likes the turbo. It's his first turbo, and now that he's felt it, he probably won't ever willingly go back to naturally aspirated.

Well, that's it for today. T did discover that the sunroof is not operating correctly. With the rainy weather not going away and 2 cars already occupying the garage, we'll be tackling that soon. Outside... in the sprinkles. Neat. Oh.. and there's a coolant leaking from somewhere. Ahh.. the joy of new-to-you cars.

Thanks, as always, for following along-