Monday, December 31, 2007

Happy Holidays

Well... I meant to post something closer to Christmas, but time seems fleeting this time of year. Nearly another month has passed and the TDI -> bus effort has really stalled. I added a few squirts of oil into each of the cylinders again, and I pushed the bus a few feet from under the basketball hoop, but otherwise, nothing big has happened. I have, however, moved closer to just doing the welding myself. I have email threaded with the cat that I mentioned in an earlier post that did his own work, and I think I'm ready to take the plunge.

Cost / benefit:
Sears sells a pretty decent 110-volt arc welder for $140. 
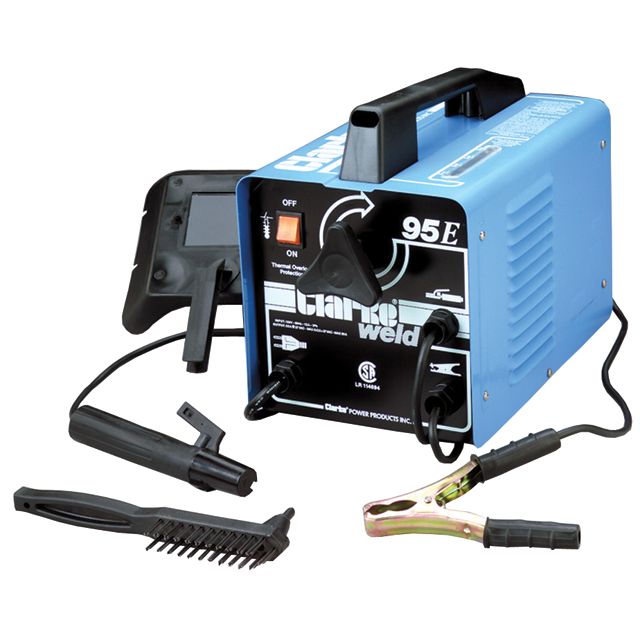
This comes with a face shield, a wire brush and a cheepy hammer. The reviews on the Sears website are positive. You can't weld without a grinder and leathers, so off to Harbor Freight we go. Angle grinder $15, leather apron, gloves, etc for $20. Those numbers don't seem right, but that's what the website says. Add a small propane torch, a table vice and a small sledgehammer. Figure the total cost, with some raw steel is around $225. Add to that the isolators (I'm thinking Ford Ranger ones as they are the right size, and handle that much torque and weight) for another $60. I was going to pay someone $300-$400 to do it, so this looks like a money savings, plus I get tools at the other end.... and a new skill.

Pro / Con:
On the plus side, I'll learn something new. I should be able to fix this mounting system if something goes awry. I'll be able to use this skill for other projects, like bodywork, or someone else's stuff. Besides, there's this whole bonding steel together thing that's kinda cool.
On the con side, I don't know what I'm doing, and we're talking about the thing that holds the engine off the ground and in the bus. If I don't do it right, and the engine isn't balanced correctly or positioned right, I could really damage the engine-to-transaxle connection or someting. Heck, the whole thing could shake loose and fall out. Well.. it could.

Basically, I'm running out of time for this portion of the project. I had initially planned to have the engine mounts constructed and the engine in-place by the end of February. This, I thought, gave me time to do the electrical, radiator, airbox, etc. by the end of June. I have sent out my last set of feelers. If I don't get a good connection from these by next weekend, I'll be buying some new tools.

I'll post my Christmas presents and the resolution to this next week--

Wednesday, December 5, 2007

engine mounting again

Not much headway, unfortunately, since the last post. I found a guy that is in the process of putting a Quantum diesel engine into his '73 bus, though. I had forgotten about his efforts completely, even though it was corresponding with him that gave me that extra push to do this. swiss-cheese brain. Anyway, he solved his mounting problem pretty simply: reuse the existing bar from the old air-cooled engine. Here's a picture of what he built.

That's what I wanted to do. He even welded his own, and has been encouraging me to do the same. Considering the last thing I welded was in 5th grade as a part of an industrial arts project, I'm not sure that's such a hot idea. What I did get out of this, though, was a general design that I can take to someone else. The key, again, is finding a non-flakey fabricator. I did order and receive a used engine bar so we can do the work without having to drop the existing engine and reuse that bar. The more I look at the pictures of the work my friend did, the less difficult this should really be. I just need someone with a welder, some skills with it, some steel stock and a few hours.
Hopefully, my next post will have some good news.

Friday, November 16, 2007

Fabricator Flakes, engine mounting

Well... I said that I was concerned about the fabricator not returning emails. I never heard from him again. Good thing I hadn't paid him for any of his time yet. After finally giving up on him, I hit craigslist.org again, looking for someone else. I figured,"if they're advertising services in craigslist, they must want some business". WRONG! I just contacted individuals thata listed in the services area, described automotive welding/fabrication experience (like building rollcages or something), and clearly stated that they wanted work. Apparently, those advertisers are just as flakey as the people who email or call about stuff you're selling on craigslist. I've email threaded with 4 different fabricators now (including the first one), and they have all disappeared.

So, I started reaching out beyond the Pacific NorthWest. There's a guy that lists conversion kits on eBay (vanamania). I sent him email asking if he'd just sell the engine mounting parts as a sub-kit. I already have the adapter plate and flywheel, so why should I buy his, right? No response. Then, I asked the guys at greaseworks in Corvalis, OR about making some minor modifications to the support bar that they sell for vanagon conversions. They said it would cost a couple thousand dollars and they couldn't think about it until March. If they were trying to scare me off: mission accomplished.

I guess its back to craigslist, hoping someone that wants to buy his kids some really cool Christmas presents will respond to my emails. I realize that I'm not a big-time fabricator, but if the original engine was held up by a simple bended bar with some mounts attached to it, and the Greaseworks guys did the same thing for an ALH TDI (into a 1987 Vanagon), why can't we do the same thing in my bus?

Wednesday, September 26, 2007

TDI - Day 2

Well, the next 8 hours have been spent on the TDI install, and I'm not really that much further along. Why? Well, most of that time has been spent doing research.

The first few hours were spent thinking and digging on the engine mounts. I found a guy to design and fabricate the engine mounts.... or so I thought. He had experience building roll-cages and building race cars, so he sounded up for it. Unfortunately, he hasn't answered emails, so I may need to find someone else. So, those hours may have been completely lost.

The next few hours were spent making decisions on the transaxle to use. After fielding advice from round the world, I found German Transaxle in Bend. They have been rebuilding and improving VW transaxles for ages. They recommended sticking with the stock 002 transaxle initially. I could get a rebuilt, hopped up 002 transaxle from them in the future for about $1500. That new tranny could get the bus up to 75mph at 3200 rpm. Apparently, there wouldn't be much of a step between gears either, as they would be changing the ring & pinion not individual gears. This was encouraging. Since I have a '84 wasserboxer transaxle with 80k miles on it and a full set of shift linkage, I figure I can sell those ($500) and be partway to the new transaxle.

Next, was finding an adapter solution that would mate the ALH TDI to the 002 transaxle. After talking with a few different vendors and fabricators, I went with Kennedy Engineering Products. They have a 091 adapter ($510) and a 002 adapter ($400). I asked if there was a need to get the 091 bellhousing and larger adapter. They said no, so $440 ($40 shipping) and 3 1/2 weeks later, I have my adapter. Upon inspection, I realize that the flywheel is 200mm and the old bus flywheel is 210mm. I'll have to get a clutch for a 68-71 bus - so my existing clutch that has less than 5k miles on it can't be reused. Maybe I can find someone that wants to buy it after I pull it.

Last, I dealt with some radiator issues. I bought a Jetta radiator from a nice cat in Southern Oregon. I bench-tested the fan with a car battery and it runs nice a quiet. I, then, took many measurements of both the radiator and the underside of the bus where I plan to position the radiator. I took these measurements to the freeware "Google Sketchup" to work through a mounting design. There are 3 mount points on the radiator, and I plan to reuse all of them. More importantly, the radiator, with the fan housing, is around 7 inches high. The body cavity on the bus is 5 inches deep. Even if I wanted the fan housing pressed against the floor, I would have a protruding radiator. I had suspected this would happen. I am still considering how deep to set the radiator, but my current thinking is to have the radiator mounts a-fix just above the bottom of the rails. This would leave most of the fan housing within the cavity and the radiator hanging below the bus, so a housing will be necessary. I had suspected that as well, and had planned to construct something out of sheetmetal to both protect the radiator as well as route air through it.

I'll try to remember to post a screen-shot of the sketchup. I don't know how well it can be used for genuine design, but it did tell me alot about how well the rad will fit without having to lie down under the bus and holding it.
that's it for now. More next time--

Friday, September 21, 2007

Housekeeping and Keeping House

It seems like time disappears in weeks instead of hours lately. I remember not so long ago an afternoon would just melt away and before I knew it, it was time to go to the pubs. I guess with kids, home remodelling and other things going on, time just vaporizes that much faster. Somehow the Summer blew by and I left town only once. I don't feel like I have a whole lot to show for it either. Sure, the kitchen is almost done, but, otherwise, it just was gone in a blink.

Now, with Soccer season starting, I feel like if I don't concentrate I'll awaken from a stupor to find Christmas carolers outside my front door. So, I've resolved to slow time down. No, not like Superman by spinning the earth backwards. I found that time moves most slowly when you do nothing as a routine and every day is completely different. As much as time flies when you're having fun, it rockets by when you're in a rut. Running through the AM routine to get out the door for the bus everymorning may be the most efficient, but not only is it the least inspired, your pre-work morning just got wasted. That's where the title of the post is coming from: who's doing the keeping? Is my house with the chores, errands and tasks keeping me, or and I keeping my house through selective choice?

I finished the french doors last night, and I'll be finishing some trim carpentry this weekend. The list of tasks shortens. The key, to me, is how the time and place of doing the tasks is decided. Honestly, it doesn't matter how hard you try to "get over the hump", because the hump doesn't have a backside - its an endless incline. Dropping everything else to work up the incline harder doesn't actually get you anywhere except further up the incline. Does the list actually end? No. In fact, the quicker items get checked off the list, the faster things get added to the bottom. Meanwhile, your kids are growing up around you, your wife is making career changes, and you're still thinking about some mundane task that "just has to get done".

Not anymore. No more arbitrary deadlines and no more morning routines. Everyone says that life is too short. Well, its even shorter when you aren't paying attention. I promised pictures from the remodel. I'll get to it eventually.

Thursday, September 20, 2007

RIP Robert Jordan

Yesterday morning I learned that my favorite modern author, Robert Jordan, died of a rare blood disease. He had been battling this disease for quite some time, so this shouldn't have come as a shock. For those of you that are not familiar with his work, he wrote many Conan the Barbarian books before starting a new series around 1990 called "the Wheel of Time". It was reading this series that I have become so attached to Mr. Jordan. There are countless reviews of these works, and all of them spent time on the NYTimes Best Sellers list, so I won't go too deep into the individual books. He brought a full-color look into a world of his creation. From inventing oaths like "blood and ashes" to inventing dice and card games, his attention to detail in daily life aspects was rich. He wrote of an entire political system. He created his own mythology and god/devil concepts.
I think what I appreciated most, though, was how he described battles. His education at the Citadel certainly aided his ability to describe battle formations, but it was the individual combatants' actions that really pulled in the reader. He was able to capture the excitement of a first-time soldier as well as the well experienced. He brought the valor and the raw power of a large battle as well as the carnage while propeling individual story lines. He dealt with food shortages, travel difficulties with armies in pre-mechanized times with great detail.
I clearly love Mr. Jordan's books. Honestly, I haven't finished the series to date, but not from a lack of interest, just a lack of time. His series had/has been a constant across my 20's and 30's unlike anything else. I never knew the author, only his works, but the world will miss all the books that he hadn't been able to write yet, including the conclusion to this series. Thank you, Mr. Jordan, and rest in peace.

Friday, September 14, 2007

Queen Elizabeth II: "We lost the American colonies because we lacked the statesmanship to know the right time and the manner of yielding what is impossible to keep."

Mr. Bush (last night): "I will settle for nothing less than complete victory.... when the terrorists and Saddamists can no longer threaten Iraq's democracy, when the Iraqi security forces can provide for the safety of their own citizens, and when Iraq is not a safe haven for terrorists to plot new attacks on our nation."

Clearly, Mr. Bush has something to learn from the Queen beyond simple table manners.

I'll get back to posting regularly. The remodel of the kitchen is pretty much done, and I've gotten some work done on the Benz. I shoudl be ready to switch back over to working on the bus in the next few weeks, weather permitting.

Thursday, May 31, 2007

what's cookin' in the Kitchen? Part I

So, I've gotten lots of questions about this remodel. I guess there's more to that story than just using it as an excuse for not posting. So, I'll post on it a bit. It'll probably take a bunch of posts, but that's how it goes. My horoscope said that today I'd need to keep a positive thought because I would have negative energy today. Well, that was really true. I got my first bill for the first week of work and I had to sit down. Oi, this is expensive. So, in keeping with the bad news, I'll dedicate this post to all the bad stuff.

First, the brain center of your house is your kitchen. When you load out of your kitchen, certain organizational patterns just don't exist anymore. So, you miss a lot of appointments, practices, games, or whatever you have going on. This brings on the next really bad thing: trying to explain being late or just blowing the appointment. You start with "well, we're having this kitchen remodel done...". The incredulous look you get from everyone, and I do mean everyone, makes it worse. You can tell they're thinking "you blow off our date, and now you're throwing this 'Im so rich, Im getting my kitchen done' in my face again". Maybe they're thinking "I don't care about your stupid kitchen stop talking about it". Regardless, your organization goes out the window, and you miss lots of appointments and you don't have a reason that anyone cares to hear. That really sucks and it puts alot of negative pressure on all of your relationships.

Second, there's dust everywhere. Sure, you tape plastic to curtain off the area, but it gets everywhere anyway. Someone told me to just do a cursory cleaning after the construction is done because it takes up to 6 months for all of the dust to settle. I figure the heating vents will need a cleaning, the furnace will need a service and fresh filters will be necessary too. Wheee!

Third, you have no kitchen. Ok, that's pretty obvious, but after eating microwavable pre-packaged foods, or worse, bags of grease from the clown-restaurant, you really miss your kitchen. Your dishes are probably disposable. So, you have either the guilt of throwing dishes away, or you're washing plastic utensils in the sink (see more on that below). Rather than cabinets, you're dining out of boxes. You might read that and sarcastically say "aw, boo hoo for you". Yeah, well after 3 weeks of that, it looses its charm. Sure, we all have moved into a new apartment or house and had to live that way for a few days. Try 3 weeks and you're still looking at another 3 weeks before its over. Yeah - that sucks.

Fourth, for a sink, you use the bathroom. Ever had to shave for a job interview around a sink full of dishes? Probably not since college. Well, I did that last week. Fun. I got the job, though, but I digress. If you already had a crowded bathroom counter (like we did), add a bowl, spoon, and cup for every member of your house to that counter. Now add 2 more cups per person because no one likes washing a cup, much less the whole batch.

Fifth (and last), your house becomes a mouse-maze. I didn't really think about just how much stuff was getting boxed up when we prepared for the demo. Those boxes needed to go somewhere, and it couldn't be the kitchen. So, half of our living room is stacked up with boxes. We have a semi-kitchen in our front entry-hall, with a table on each side with boxes all around. The new cabinets are in our dining room in boxes. As a result, you can't go more than 2 steps without stepping around a box, or something else. Its a bloody mouse-maze, and it slowly drives you crazy.

Basically, you're disoriented because your house is running without a head. You're eating poorly, there's dust and boxes everywhere, and you can't find anything... oh, and it lasts at least 6 weeks.

I'll post some progress pictures and some positive thoughts next time...

Friday, May 25, 2007

no more training wheels

I realize its been a couple of weeks since I posted anything. Life has been busy with a job change and a kitchen remodel taking place at the same time. So, I haven't really had any time to do anything on Hapy other than look at him. With Camping season approaching, I realize I'll have a lot to get done in a very short window of time after the Memorial Day break if we plan on getting out much this Summer. Last Spring, the same thing happened. In fact, this story comes from last Spring when I was trying to get the auxillary battery operating the way I wanted it to: just power the interior lights. Electrical stuff always takes longer than you think it should, and this was no exception.

It was a warm Spring day, when I discovered I had a couple of hours to devote to chasing one of the pre-Summer projects on Hapy. The lawn had been mowed, the roof had been swept, even the gutters were clean. I had not completed the installation of the 1979 Westvalia interior, so I wanted to focus on that. After much thought and discussion with friends, I decided that the little early baywindow bus alternator would not be able to support the demands of the late baywindow electric refridgerator. "Ok, so no fridge," I thought. "who cares?" In fact, the wiring of the whole secondary circuit assumes that the only thing that second battery is going to power is your fridge. Even the water pump for the sink ran to the primary (starter) battery through the main fuse panel. I thought it was really stupid to have all this extra wiring just for a tiny fridge, so I figured no big loss. I traced the lines on the wiring diagram and spliced into the line that was carrying the juice to the refer. I routed this to a small fusebox that I buried in the cabinet behind the fridge. The fridge would now be used to hold bottled water. I ran wire from that fuse block behind the cabinetry and inside the ceiling to the dome lights. I ran more wire behind the stove to a 12V power jack I installed into the stove. All of ths took me about 2 hours, and sets the stage for the real story taking place outside the bus.

As I mentioned above, it was a beautiful Spring day when all the kids in the neighborhood are playing in the street. We hadn't had many yet that year, especially on a weekend, so it was rockin'. My 2 boys were riding their bikes around the street with a couple of the neighbors and there were a few others shooting hoops. I had been working inside Hapy for about half an hour when my younger son (4 years old at the time) came up to me and asked "can I borrow a grinch?". Hmm.. I'm thinking. I wonder what a "grinch" is... "Of course," I respond. "Help yourself." He climbed up into the bus, pawed around in my toolbox, and set off. I didn't really notice what he'd been doing as I was up to my armpits in wiring. About 15 minutes later (and not much further along with the wiring), the corner of my eye spotted some movement right outside the window above the fridge. It was my 4 year old riding by on his bike - without the training wheels. In the time it took me to figure out which wire was the "hot" wire, my 4 year old had learned how to remove his training wheels, removed them, replaced the nuts and learned how to ride a 2-wheeler. By the time I finally gave up on my re-wiring attempts that day, he was riding the bike off the curb.

The wiring is still not perfect, but the dome lights run off the accessory battery, as does the water pump for the sink. The 12V accessory jack is powered that way too, and all of them run off the shore-power when I plug it into an outlet. All that's left is running a car stereo off that battery and I'll be satisfied. As for my 2-wheel riding 5 year old, he rides his bike down stairs and off rocks now that he's 5. He bunny-hops his scooter too, but that may be best left for another day.

More next time...

Wednesday, May 9, 2007

What a treat: a $10 seat

With a big kitchen remodel project just starting on the house, and my current contract coming to a close, I guess I've left the blog a little thin lately. Sorry. I haven't been neglecting the bus as badly. Between interviews, lacrosse games (older son's team), piano lessons and trips to Home Depot or wherever looking at backsplashes, I scored a few new-to-me things for Hapy.

First, I found a pair of front seats on craigslist for $20. Sound cheap? Heck, yeah, but they are almost complete, they match, and they're from a '74. "So what?" you say, "what makes them so great?". Well, first, there's the price. I mean, come on, you can barely buy a pizza for $20. Then, there's the fact that they are actually more comfortable than the original ones. In 1972, VW still was installing the seats without headrests. Mr. Nader came along and helped change the law so we wouldn't all be walking around with those whiplash collars. So, by 1974, the seats had headrests, so for $20, we have more comfortable seats that will actually not be a pain in the neck if we crash. Great. Now, if there was only a way of protecting my knees in a crash.... I'll be re-stuffing and recovering the seats eventually, but its not necessary yet, so I'll wait on that. Oh, you noticed that big tear on that one seat. Yeah... about that. Hmm... Throw a towel on it and call it good until after camping season. We're not going to let a little thing like that get in the way. Have you seen my old seats? I'll put a picture up eventually. They were unsupportive and unpleasant.

After the seats, I found some of those retractable seat belts. Sure, by 1972 the inertia reel seatbelt was as fresh and new as the vacuum-tube, but VW hadn't quite caught up yet. Apparently, the VW Bus was termed a "truck" at import, so retractable seat belts weren't necessary. As I mentioned in other posts, VW would do whatever was necesasry to save a dime, and interia reel seatbelts apparently were expensive, or at least more expensive than those unforgiving stock belts. They can be expensive now, if you only shop in stores. Online, a pair of retractable seatbelts can run $200. That's alot of beer. Back to craigslist we go. In my searching, I learned that most German auto manufacturers would outsource their seatbelts to a handful of companies. So, if you want retractable seatbelts, you just need to find a suitable donor. Audi? sure. BMW, Porsche, Mercedes.. You get the point. I found a guy parting out a 1985 Mercedes Coupe that hadn't been in a wreck. That's the other important thing - seatbelts are basically a one-wreck only part. Once they've been activated in a crash, the webbing stretches and isn't safe for re-use. Remember that the next time you're fixing your sled. Anyway, $40 and a drive to Aloha and I have a full set (4 belts). I'll be installing the front belts once I get a spare moment. The only advice I can give beyond what I've already said is to take a picture of how the belts are originally oriented in the donor car so you can get the proper action on reinstallation.

That's about all that's happened bus-wise this past week. The kitchen has been demolished, so we're eating cold food off of paper plates, but I'm sure it will be worth it. We'll just pretend if its not. I'll walk through the seat belt install when I get it completed.
More next time...

Tuesday, May 1, 2007

Rust Never Sleeps

It was a beautiful day here in the Pacific NorthWest on Sunday. The kids were playing in the street, lawn mowers were humming and I was trying to find something on Hapy that I could putter on while really just enjoying the weather. Now, I could have opened the garage door and started the process of tracing circuits and plugging things in on the new engine. That would have been too productive, though. Clean the garage? Reorganize the shop area? Nah... How about tearing out the front carpets in the bus? Well, that sounds like making more work for myself later, so... lets do it!

The "original-to-me" carpet was attached to the floor with sheet metal screws. "Interesting idea," I sarcastically thought. The carpet itself was a striped orange/brown indoor-outdoor carpet, so even finding the rusted heads wasn't easy. Once located, it was clear the most of them has rusted in place. A hammer and chisel quickly took care of that, and the carpet was no longer attached. Under the carpet was the original rubber mat. It looked a little worn along the edges, but otherwise, it looks serviceable. I'll be reusing it. Under the mat, though, was clear evidence of neglect: rust, and it looked like lots of it.

I'll post the pictures I took with my cell phone later, but for now, lets just say that there was a nice dusty pile of rust under the rubber mat. A few minutes with a dust-buster, and then a dust broom, made me feel much better. It didn't look nearly as bad. After wire brushing the rust to get the loose stuff up, I cleaned it with some soapy water, and dried it with paper towels. The "wire brushing" was just hand-scrubbing a handled wire brush, not some power tool, by the way.

There's a commonly available substance called Naval Jelly that's great for getting rid of rust. No, it is not the distant cousin of Toe Jam, it actually eats the rust. I blobbed a lot of Naval Jelly onto the rusted sections of floor and spread it around with a paper towel. it was about this time that the kids wanted to shoot some baskets, so I spent the 20 minute waiting period showing off my dunking prowess on a 7.5ft basketball hoop. Yeah, I got the mad hops. hehehe...

I kinda lost track of time, but fortunately, one of the neighborhood kids discovered the garden hose and started spraying everyone. That's when I remembered the Naval Jelly cooking my rust. I took control of the hose and turned it onto the inside of the bus. The incredulous looks on the faces of the kids when I started blasting the water into the bus was truly priceless. It did, however, get the Naval Jelly off the floor. After squeegie-ing the water out, I dried the floor a second time with paper towels. In the pictures, you can see the places where the rust was completely consumed - its a dull grey.

Once the floor was completely dry, I poured Eastwood's Rust Encapsulator onto the treated areas. Rust Encapsulator converts the rust into an inert chemical, seals the rust away from air/water and serves as a thin primer. After 24 hours, it can be painted with any automotive paint without concern. I spread the paint around with a piece of cardboard. Yeah, I could have bought a case of disposable brushes from Harbor Freight, but the finish didn't need to be pretty, and I just wanted the product in contact with the right areas. When I was done, the strip of cardboard can still be recycled. I left the crank-out windows open and the poptop up over night while the paint dried.

I was lucky. The floor had been ignored my all of the previous owners and yet I didn't have any rust-through. In fact, the rust was mostly cosmetic, and wasn't really very deep. The pictures look worse than it really was. I need to paint over the Encapsulator with something to protect it. The Encapsulator scratches easily, and shouldn't be used as a topcoat. I have lots of different cheap rattlecan paints, and I'll probably pick one at random. Ultimately, those sections of floor will be covered with sound deadener, then the rubber mat and then a new carpet, so the color is pretty much insignificant. As I complete those steps on subsequent beautiful sunny days, I'll post on it.

The progress on the bus will come to a stop for a few weeks while we get some projects completed on the house. As I get tiny windows of time, though, I'll be completing some of the camping interior install from 2 years ago that were left unfinished, and reassembling the front floor. Camping season is about a month away, so I have to maximize what little time I have.

until next time...

Monday, April 23, 2007

paring down the laundry list

Its that time of year when you take stock of all the things you wanted to do over the Winter, but just didn't manage to get to. I look at Hapy, and I'm reminded of all the projects that aren't quite finished and the projects that I want to start. I made the mistake of writing down all the things that I haven't finished yet, or want to do, and it is incredibly long. It seems like the same thing happens when I think about the yard, or some house aspect. Before I realize it, the scope of the project gets so massive that it becomes completely impossible to fathom how I could even consider starting such a project. I thought I'd lay out how I take a list of considerable length containing projects of different scopes and priorities, and cut them down to managable bits.

First, you have to write it all down. It doesn't matter that some of the items are gnat's ass details and others are vague high level descriptions. You gotta write them down. Sounds simple enough, but once they're written down, you can shift them around on paper and it frees your head for actual thinking instead of list maintenance. Make sure your significant other's items are on that list or all of this work will be for naught.

Second, prioritize. Sometimes, that's really easy. Other times, I get to this point, and get stymied by "yeah but's". You know things like I have to wash the patio, but I have to clean the gutters and the gunk from the gutter cleaning will land on the patio..... yeah, but we're having some people over in a few days and the patio needs to be clean... yeah, but its supposed to rain... death cycle. Just put the same priority on both of them and move on. You're just trying to get to a point of seeing what's most important, if dealt with completely independently.

Third, define dependencies. Again, this can be really easy, but in the back of your mind, you have that voice in the back of your head that's squaking about how much time you have to do this or that. Tell the voice to be quiet so you can finish this. The rain gutters and the cleaning of the patio seem dependent, but they're really not. You'd like to only clean the patio once, but what you'd like to do isn't a dependency, its a preference. A true dependency would be having to buy a ladder before you clean the gutters. Think in those terms. For those projects that are just vague ideas, you can't do this part. Those vague ideas have to become something that can be defined at a detailed level, or you really can't go much further. If the highest priority item is one of these, sub-step it.

Fourth, estimate times. This is probably the hardest part. I never get this right when doing bus stuff. Most car work, though, has been done by someone else, and its probably documented on the web somewhere with a statement of how long it took them. For me, I take their estimate and add at least another 50%. I work slowly and deliberately and I have tiny windows of time to work, so that multiplier works for me. Estimate in hours not days and not minutes. If you can't think in terms of hours, your level of granularity is off: thinking in days means not enough detail, and thinking in minutes is probably too much detail. If you're doing something you've never done, make sure you have a step for learning how, and add some time for the actual doing of the work.

Fifth, calendar your work. Between lacrosse and baseball games and practices this Spring, I'll have almost no time to do anything. But there's always an hour here or an hour there that I can get something done. I like to pick a night or 2 of the week that I'll spend a couple of hours each doing something after the kids are in bed. Obviously, I can't do autobody work with the big hammers in the living room then, but other items on the list may be more suitable. Also remember there are lots of things that need to be done to keep a house running, so remember that laundry doesn't wash itself, food doesn't magically appear in the kitchen (or on a dinner plate) and lawns still have to get mowed. This sounds obvious, but my early project plans forgot about some of this stuff. Also account for sloth time as you will spend time surfing the 'net, reading a book or watching tv and you need that time for mental health - guilt free.

Last, execute your calendar. Things will go wrong, items will be dropped and you'll want to add others. To add items, you really need to start at step 2 (prioritization) and go through the rest of the steps. Otherwise, the new item will invariably get stuck at one end or the other of the list, messing up all the planning work you did.

I had intended to post my laundry list of things that I want or need to do to Hapy, but diagramming my process seemed more important. I'll put my list, and my following of these steps into the next few posts if for no other reason, so that they'll be written down.

Monday, April 16, 2007

TDI - Day 1


I figured the first 8 hours of clowning with that TDI engine qualifies as a "day" of work. I wouldn't exactly call the hours terribly productive, but they were fun. The hours started with the receipt of the pallet at my house. The picture shows what it looked like. It was completely encased in a plastic sheet and that stretchy plastic stuff that's like saran-wrap for pallet building. I used to use it when I worked warehouse. It was held down with rope and load locking straps.

I can't say enough about how well packet and carefully assembled the engine was. Eric, the cat from Georgia that sold and shipped the engine, removed the alternator and power steering pump. These were packed separately in bubble wrap. The instrument cluster and the ECU were also separated into bubble wrap and another box. The pallet itself had 2x4's nailed to it so the engine sat in a kind of cradle. I think a few little bits broke in transit, but I'll see how bad that is later.

This next picture shows all the other parts that came on the pallet in various boxes. Roughly in the center, there's the catalytic converter.
Below that is the top edge of the intercooler. Next to that is an assortment of plastic for the routing of the intercooler air under the exhaust header. Above that, is the belt tensioner. To the right of that is some of the coolant hosing and the accelerator pedal. What it doesn't show is the thick bundle of wiring, nor all the wiring that was still attached to the engine... nor the main engine itself.

You can see the engine after it was unwrapped and popped onto a rough engine scoot I built. It is my hope that I will be able to get this engine into the engine compartment and aligned with a transaxle just like this: straight upright. The flywheel (and eventually the transaxle) are on the other end. In the picture, you can see the gap in the lower right-hand corner where the alternator goes. That lower pulley (actually its the drive for the serpentine) is not resting on the wood. I measured it to make sure that it didn't. There are lots of wires and bundles all over this engine that need to find homes. Just figuring out this wiring bundle will take some time.


Finally, here is the scoot by itself. Its construction took all of a couple of hours, and alot of that time was spent finding the wood. I made it with recycled 2x4's from a scrapheap in my backyard and some casters that I got on clearance a few years back. Its basically a 3 sided square that's 15" deep and about 8" across. After assembling the simple square (where the backplane was 1" lower than the tops of the supports), I added 2 more pieces at a right angle to the supports to help make it more rigid. The extra inch lowering helped provide a way of attaching the supports to the back. I then bored holes for the caster screws. I used screws that were leftover from a backyard swingset that were 3" long. Last, I added a thin piece (1/4") of trimwood across the bottom to help prevent the open ends from pushing outwards. Why is it open at one end? Because the flywheel comes down so far, it was really necessary.

The scoot actually works surprisingly well. I have moved the engine around a few times and it doesn't wobble nor feel like its going to tip over at any second. I will probably have to buy an engine stand at some point, but until then, I have a place to keep my engine that is upright and accessible so I can get the components back onto it. The engine floats just inches off the ground, so with the low center of gravity, it should stay relatively stable.

That's all for now..

Friday, April 13, 2007

Engine decided

Well, after pushing throguh all the emails and chatroom advice, I've made a decision about the engine choices. If you recall, I had asked for some advice about what to do about Hapy's engine. The existing engine (aka "the Limper") really doesn't have much push anymore.

I coud go the cheap route and get one off of craigslist. I know a cat in SE Portland that's doing that, but his motivations are different than mine. He needs effective transportation now and his original engine has a trashed head. Different situation. He's going to rebuild his original engine while getting A-to-B with the craigslist engine. Good luck, Josh, it looks like you have it under control.

I thought about getting an off-the-shelf (AVP) engine from busdepot. I like BusDepot, and I've heard good things about their upgraded heads. The problem is their most powerful engine still only makes about 68HP (more importantly 99ft/lbs of torque max). Better than the limper, but still not that great when you're loaded with a family of 4, camping gear, food/ice for a week, etc.

Boston Bob was a late entry that didn't get a dedicated blog posting. He makes good reliable engines. They are reportedly more reliable than the off-the-shelf variety, but not necessarily any stronger, so we think about upgrading both the power and the price...

The first more expensive option was the TDI engine sitting on my garage floor. Most of the responses I got from people that knew what this engine was went something like this: "you have a TDI engine!!! Aw.. I've dreamed of putting one of those in my bus..." Not many really knew how much work it would be, but I was told by a guy that does these conversions on vanagons to consider 100 hours a fair starting point for estimating. 100 hours! Holy crap, that's a lot of time! But how much calendar time would that be? I mean if I have an hour here, and an hour there, that could take, like, a year.

Jake Raby got a full posting, and he makes some great, powerful engine kits. A Raby camper special is rated at 92HP (120ft/lbs torque). That's a lot better for getting into the Cascades with a full load. The sticker shock was one detriment, but the biggest blocker was that it was a kit and I'd have to find a good case and assemble the engine. Good learning opportunity? Yes. Get to know your engine all the way through so when something going "boink" you know what it was? Absolutely. Keeps the air-cooled bus as close to stock as possible while delivering a measurable power boost? Definitely.

So... what's the decision? I'm going with the TDI. In the end, I really want to run biodiesel. I feel like driving a hippy icon while getting 16mpg (and pumping high smog exhaust output) on MidEastern oil just wasn't ok. The increase in power will be considerable. I'll post the exact numbers from the dyno charts I have on my PC at home, but from the web, the HP will be around 90 and torque peaks at about 145. I am setting very low goals and expectations for this, and I'll document everything I do in this blog so that someone else will have a better idea of what it will take to do this. Hapy is still on the road, and his original engine won't be pulled until after camping season this Fall.

Wednesday, March 28, 2007

Head Banging without the Music

One of the unique characteristics of a 1972 VW Bus is how you get at the engine. For those used to leaning over the front fender of your favorite car, cold beverage in hand, while considering your timing, or the next oil change, or the Red Sox pitching staff, its a little different with an old bus. First off, the engine is in the back, which makes for some funny conversations at the annual smog check. It makes leaning on a fender impossible too, though the rounded corners are good for leaning :)

Once you're realized that the engine is back there, you discover that its behind a little door where the license plate sits. Pop that thing up, and you're in wonderland. Alice's wonderland, that is. For in the 1972 bus, that little door is the only way to get at your engine. I think of it as vehicular proctology. Between the coveralls, flashlight and tools, you can barely get in the door, much less do anything. Makes you wish for a little "eat me" cake, but that feeling only gets stronger when you realize you forgot a tool or need a sandwich and try to remove yourself from that doorway. *BANG* the back of your head hits the upper threshhold. That's why I always pop on a snow-hat before climbing into my engine door. I admit, its awfully hot doing that in the Summer, but its better than the inevitable headsmack. This one-door deal is really only a 1972 bus issue, as a top-hatch was added in 1973 and continued through the vanagon.

I'm tired of wearing a ski hat in the Summer. I want to be able to check something on my engine without getting down on all fours. I want to be able to lean against the engine opening and talk about the Red Sox pitching staff, and actually be able to see the engine when I'm doing it. So, what to do... why, cut a hole! Well, that sounds rash, but installing a door on the topside isn't such a bad idea. The question is how big a door? Would putting in a door compromise the structure of the bus or would additional bracing be necessary? Here are a few choices:

Baywindow bus hatch is 11" deep by 31 1/2" wide. Not too big, but engine access is achieved. Additional support or bracing is probably not needed, but I'd probably do something just to be sure. I don't think these are of much real use, though, because they're really quite small. With the coveralls and tools, can you really reach through an opening 11" deep and do anything other than utter muffled curses?

Vanagon Hatch. is 42 3/8" x 25 1/8". Huge. Makes one wonder "how much of your back would not be a door?" Well, I measured my back panel just for kicks and its 34" deep and 42" across to the westy closet. I'll remeasure tonight and repost if the numbers from memory are off. Its actually 44" across by 32" deep, but there's really only about 23", maybe a touch more, from the firewall to the rear door. Regardless, it tight. Additional supports or bracing would totally be necessary. A removable support in the center might be a good idea too. Big enough? Heck yeah. The lid would open like the hood on an old Monte Carlo. Of course, you'd breach the firewall with a hatch like that, at least according to my measurements, so this may not be such a good idea after all.

Type3/4 Hatch is 22" x 31" give or take a 1/4", with 34" on the diagonal from rounded corner to corner. Sounds about twice the size of the bus hatch, but not as big as the vanagon. It would barely fit, but bracing would be a good idea. Also, finding a lip might be a challenge, as the type3 and type4 cars are not as plentiful, and there are multiple layers of steel that would have to be cut through to get the original lip. Considering the closeness in size to the baywindow hatch (times 2) maybe 2 donor hatch frames could make a single lip. Sounds like it could be a lot of work.

make your own is always a choice, but rarely a good one. Lots of cutting, fabricating a door, maybe from the cut out steel doesn't sound like too great an idea. The edge of the cut out would need to be strengthened by something like a home-made lip. In the end, it won't look too good, probably won't be structurally sound, and will probably leak emissions into the bus. Bad idea.

Of the 3 decent ideas, I like the size and lineage of the type3/4 hatch, but the amount of work does give me pause. If I really need engine access from above, it will take more than cutting a hole and glueing in a vinyl window. Accordingly, I'll have to really plan this out before I do anything.

If you're thinking of putting in a hatch, I hope these dimensions were helpful to you. I collected them from different owners and part suppliers and should be pretty accurate. Thanks to the BusCo, theSamba and theDDB for helping collect the measurements.

Tuesday, March 27, 2007

new engine opinions: update

I've gotten a great response on this via email. I want to thank everyone that read through all of the different options and offered their opinions. I have some new information about the TDI option, and a 7th option that many readers felt I overlooked.

TDI update
Kennedy Engineering, aka KEP, has responded to my questions about an adapter plate, and have indicated that they can support either the original transaxle or the one on the floor of the garage (091/1), or the later baywindow transaxle (091). Since the bellhousing for the 091 can fit on the 002, I have more options. I'm not sure if that's good or bad at this point.
I also found a website for a guy in Australia that built his own under-mount radiator setup. I'll add a link here later, but it was primarily pictures with very little text. I've also received emails from a company over there (Custom Offroad) that constructs an undermount radiator. They've apparently done a lot of these, but mostly for Subaru engine conversions, and their customers go off-road... in the desert. Sounds pretty convincing that they work.
Last, someone pointed out to me that the TDI engine can be "chipped" so it puts out considerably more power, so I shouldn't have rated it second.

Missing option
A number of readers felt that I overlooked ordering an engine from "Boston Bob". He has a great reputation in the aircooled VW community and has been doing it for a very long time. His quality falls above the BusDepot/AVP special, and is probably on par with Jake (the Camper Special), but not as expensive. I'm sure there are subtleties between the finished product that each can produce that explain the cost difference. I know Jake has been experimenting with higher output engines and trying to build with near-stock longevity. As I understand Boston Bob's approach its: building engines that are closer to stock that last nearly forever. Bob can build more powerful engines just as Jake can build less powerful engines. They have different approaches. Regardless, Boston Bob should have been in the choice list as he offers an improved engine at just above BusDepot prices.

That's really all I have for today. Because of a family reunion event that is warming up in CA, the bus may not make that Lake Shasta trip. That may be for the best if his engine is in questionable condition and his replacement is not yet ready for install. I'll have to figure out a way of explaining it to Hapy....

Monday, March 26, 2007

Travel planning, the old bus way

For the past few years, we've planned our Summer camping trips in winter. This seems awfully early to most folks I know, but camping in an old bus isn't the same as camping in a class "A". Besides, when better to think about warm weather camping, and swimming holes than during the typical NorthWest ground-soaking downpours. Not to mention the 40 degree temperatures. So far, we've planned a run down through southern Oregon to Lake Shasta, CA and a couple of weekend trips that are more local. The big southern run, though, requires more planning than just throwing a dart at the map.

how far can you sit in that 30 year old seat?
My backside answers: shorter than last year, and you didn't plan it well enough then either. Quiet you. This question, though ties into travel with kids in that they can't stay in a seat for too long either, regardless of how comfy. Seeing how there's no integrated DVD - game console - kid quieting machine in a '72 bus, frequent stops and an abbreviated travel day is necessary. Figure too, that camping in a non-class "A" manner means you have to do more than park to set up. This brings on the second question.

how long does it take to go from pull-in to set up?
Like the first question, I usually underestimate our ability to get set up, but the other way. My wife barely has time to say "we're finally here" between the time we pull in and the kids are tooling away on their bikes. Setting up "the shed" (2 person tent we use for holding the stuff we don't want to trip over in the bus) takes all of about 10 minutes. The rest of the set up of tablecloth, sleeping bags, coolers and stove is much faster than we realize. So, though the class "A" parked next to you may have pulled in and had the tv on faster than you could say "my, that's big", the microbus camper really can go from pull-in to dinner cooking in about 15 minutes. Faster if you put your beer down, but I have to do that enough at work.

now hot will it get?
Without A/C, this is actually an important question. The aircooled bus needs to cool off when the ambient air gets hot. Driving in 100+ degree weather is rough on you and the bus, so frequent stops are necessary to exchange the fluids in your body and to let the bus cool off.

what does the google map say?
I take the google map estimate and add at least half again to it. If they say it'll take 4 hours, I plan on 7. Why? Well, for one thing, the bus top speed is 60. That's straight downhill with a tail wind, etc. It goes 0 to 60 in about 15 minutes, so figure that in the amount of time it takes to go from dead stop to full speed, you could set up a campsite. Besides, between restroom stops, getting drinks and stoppnig to look at stuff, it really is a miracle we get out of the neighborhood, much less our destination.

In the end, we plan our travel around destinations, like everyone else, but we plan around midpoints nearly as much. We will stop every hour for something, even if its only drinks, and we'll get there after everyone else. Since we're making our reservations in March, we don't have to get there early to get the last of the unreserved sites, so it doesn't matter. Now's the time to plan your Summer, and don't forget to consider how far you need to go, who's riding with you, and what you're driving. Stop often, and when you can, take a side road. It can make the trip.

Thursday, March 22, 2007

So you wanna post a comment...

That was totally my fault. Here I was thinking, I'll ask a wide open question, and I'll be able to look through the comments to see what all my wise friends and readers think. Then one of my friends points out "hey, I need a blogger account to make a comment? That sucks, man". I'm all "huh?", and then I see it in the configurations thing. %@#$%! So, you wanted to post a comment, and the thing wouldn't let you? Well, not anymore. Feel free to post a comment, but please try to keep it as clean as, say, your Jr. High gym teacher would (no Carlin can't-say-that-on-tv words, but "crap" or "sucks" is fine with me).
I've gotten a strong response to my engine choices posts via email, and I hope they continue. If you have input, regardless of how valuable you may feel it is, its valuable to me.
Thanks again. I'll post a decision if the right one becomes glaringly apparent.

Tuesday, March 20, 2007

new engine options: used / collect parts

The final entry of the multi-part posting. This time its about helping me make a decision on Hapy's stock 1700 engine. The choices are below, and this post is for the last 2: used engine or collect parts. I'll have one post for each choice, so they don't get too long. Hopefully, I'll get some good feedback and be able to make a good choice.

1) keep the limper
2) a Raby Camper Special
3) the TDI engine I have on my garage floor
4) a BusDepot special
5) some used engine off of craigslist
6) build one from parts collected off the 'net, parts stores, etc


The final 2 choices aren't really viable, but I'm adding them as alternatives anyway.

5) buy a used engine off of craigslist or wherever.
This is dicey. Obviously, the person selling it has their reasons. Maybe they're just killing a project. Maybe they're selling a dud. Assuming there's a good compression test to go on, a decent engine could be found this way. This doesn't get me any closer to where I want to be, though: more powerful, better known engine. Actually, the best I could hope for is slightly better power, but a lesser known engine. Which is better? *shrug* They can be found for $500, though. That's pretty cheap. And no shipping, but you gotta be fast, know what you're looking at, have a way of getting it home, and cash in pocket. You have to be willing to drive to the very edges of town as, inevitably, that's where the current owner of your engine lives.

Choice summary ranking as compared to other choices (1st, 2nd, etc):
cost (1-6): 2nd
work (1-6): 3rd
power (1-6): 5th
mpg (1-6): 4th
reliable (1-6): 5th

6) buy parts and assemble it myself.
This has the bad side of having to assemble it (Raby) without the power boost, reliability and general well-being found in getting a full kit. For some reason, no other manufacturer has gotten into the space of complete rebuild kits. You can get piston/cylinder (P&C) sets, camshaft and lifter sets, and gasket sets, but there's no complete set. So, you're wading through the shiny magazines trying to figure out what won't blow up if you put them together. There's your recipe for a restful vacation - put one of those mystery combo's in your bus and head for the outback. Uh... no. The pricing probably lands below the AVP, but with assembly. MPG is really anyone's guess... just like the engine :)

Choice summary ranking as compared to other choices (1st, 2nd, etc):
cost (1-6): 3rd
work (1-6): 5th
power (1-6): 4th
mpg (1-6): 5th
reliable (1-6): 6th

new engine options: BusDepot

Another multi-part posting. This time its about helping me make a decision on Hapy's stock 1700 engine. The choices are below, and this post is just about the BusDepot/AVP engine. I'll have one post for each choice, so they don't get too long. Hopefully, I'll get some good feedback and be able to make a good choice.

1) keep the limper
2) a Raby Camper Special
3) the TDI engine I have on my garage floor
4) a BusDepot special
5) some used engine off of craigslist
6) build one from parts collected off the 'net, parts stores, etc

4) a BusDepot special
$1925 ($300 of that is a core deposit you get back if I send the old engine to them) delivers a new 2L engine, including new heads (with improved valve seats) that would fit my existing set up. If the Raby Camper Special is the Cadillac, then this is the Ford Taurus - pretty reliable, not too flashy, not too powerful. At 68HP, its pretty much the same engine I have right now, only newer, with some better machining on the heads. On the upside, we'd know the history of the engine, and know that the parts were supposed to go together. Its already assembled, so I'd just have to pull my old engine, switch the accessories, and stuff it into the bus. That sounds easy, and it pretty much is. Figure a day's work for most, 2 or 3 days for me cuz I'm slow and careful and I usually add things to the list whenever I do something big. Wee...

MPG would still be in the 18 range, like the limper. I think hill power would be better than the limper because I think the limper is one tired engine. (and some folks said I couldn't put the word "limper" in a single sentence 3 times. Bah!) This represents just about the least amount of work, but the engine probably wouldn't last nearly as long as the Raby. Raby engines last pretty much forever (so the owners say, you'd never get him to say that), whereas the BusDepot (AVP, really) ones will last 40k miles. It's aircooled, and all that. Like the Taurus, there isn't really a whole lot good or bad to say about it.

Choice summary ranking as compared to other choices (1st, 2nd, etc):
cost (1-6): 4th
work (1-6): 2nd
power (1-6): 3rd
mpg (1-6): 3rd
reliable (1-6): 2nd

new engine options: TDI

Another multi-part posting. This time its about helping me make a decision on Hapy's stock 1700 engine. The choices are below, and this post is just about the TDI on my garage floor. I'll have one post for each choice, so they don't get too long. Hopefully, I'll get some good feedback and be able to make a good choice.

1) keep the limper
2) a Raby Camper Special
3) the TDI engine I have on my garage floor
4) a BusDepot special
5) some used engine off of craigslist
6) build one from parts collected off the 'net, parts stores, etc

3) The TDI engine I have on my garage floor
First off, I got this engine for a good price. On top of the bare engine, I got the complete list of accessories necessary to install according to fastforward.ca (a company that installs TDI's into vanagon's). "but wait," you say. "yous gots a bus, fool." Yes I do, and yes I am. Thanks for taking note on both counts.

A TDI is a watercooled engine, and Hapy doesn't have a radiator. There are different solutions for this, but none are easy, and none are perfect. The Austrailians put a radiator under the floor. Its a real sleeper look, but it depends on fans running most of the time, and I can't find a real person over there to say "its great, mate", so I question how well it works. There are folks in the states that have put a radiator on the nose. No matter how well disguised, its still a radiator on the nose, so of the 2 choices, I prefer the under-the-belly choice. Either way its time and money regardless, and I don't have a limitless supply of either.

The TDI engine doesn't mate exactly with Hapy's transaxle. It doesn't mate exactly with anything except a TDI transmission, actually, so some kind of adapter plate (read: mo' money) would be necessary. I have yet to find an adapter plate that would go between a TDI engine and the old 002 transaxle, so I'd have to either use the vanagon transaxle on my garage floor (a great source of parts, that garage floor is) and figure out how to get it into the bus, how to shift it, etc, or figure out a way to get the engine to mate with Hapy's current transaxle. Neither choice is exceptionally clear from the transaxle and conversion people I've spoken to.

The engine doesn't attach to the frame in the same way as it did in the donor, of course, so I'd have to fabricate something (hire someone) to do that or try to find a pre-built kit. Someone over at Tiico said they had one, but they've become strangely silent now that I'm asking part numbers and such. Not exactly steadying. Still, this conversion has been done successfully, so I would just need to contact one of the folks that have done it and copy their solution.

Last, there's the wiring bit. The wiring in an old bus is about as complicated as the wiring in your uncle's old hunting cabin: 3 wires and none of them do anything. The wiring on these new engines could probably be sold as military secrets they're so complicated. Getting the wiring harness (think bundle of wires as thick as a quarter) to integrate will be a considerable challenge.

A TDI engine has about the same power as the Raby Camper Special (96HP -v- 92HP), but it should get 33MPG or better. Also, I'm starting to brew biodiesel for the other 2 cars (Jetta TDI and Mercedes Wagon), so fuel costs would be much lower. Low enough to offset the costs of getting the engine in the bus? At $1/gallon it will eventually, it would have to, even if the cost for regular gas stays flat. The savings is really pushed by how much the bus is driven. If its pretty much Summer-only, then it'll take a while. "Identity" concerns abound with this choice. Even if its a VW powerplant, the shift to watercooled is pretty dramatic. If I can keep the radiator under the belly, it wouldn't be as obvious.

Choice summary ranking as compared to other choices (1st, 2nd, etc):
cost (1-6): 6th
work (1-6): 6th
power (1-6): 2nd
mpg (1-6): 1st
reliable (1-6): 3rd

new engine opinions: Raby

Another multi-part posting. This time its about helping me make a decision on Hapy's stock 1700 engine. The choices are below, and this post is just about the Raby Camper Special. I'll have one post for each choice, so they don't get too long. Hopefully, I'll get some good feedback and be able to make a good choice.

1) keep the limper
2) a Raby Camper Special
3) the TDI engine I have on my garage floor
4) a BusDepot special
5) some used engine off of craigslist
6) build one from parts collected off the 'net, parts stores, etc

2) The Raby Camper Special

This is besically the "Cadillac" of air cooled engines for a bus. Maybe the "Cummins TurboDiesel" would be more appropriate. Peaking out at 92HP and 120 ft/lbs of torque, these engines fly, have better MPG (Jake has said mid 20's), and can actually tow things. Now, just the thought of seeing a bus towing a small boat makes me laugh, but the idea of having that kind of power available without altering the 'identity' of the aircooled bus is appealing. Not so appealing: the price. At $4200, this is not a tax refund only kind of purchase, and I'd still have to put it together. That's precious time, baby. Also, a rebuildable core might be a good idea as I really have no idea what shape the existing motor is in. Considering that it's running, I'm going to go out on a limb and say "its fine". Still, if there's a camping trip in the offing, building on a new block while puttering on the limper might be a good way to go about this. Flame me if you firmly feel otherwise.

Raby and his folks pre-assemble the engine, so you know the parts work together, and actually fit what you're doing. They're well respected lots of years in the biz, blah, blah, blah. Basically, its a killer engine at a budget busting price. If this is the choice, I can sell the TDI engine and stuff and mostly fund this, so cost isn't that much of a barrier, but its still pretty frickin' spendy... and its still burning dino-fuel even if the MPG improves into the 20's.

Choice summary ranking as compared to other choices (1st, 2nd, etc):
cost (1-6): 5th
work (1-6): 4th
power (1-6): 1st
mpg (1-6): 2nd
reliable (1-6): 1st

next... the TDI on my garage floor

new engine opinions welcome

Well... I've been really distracted lately with the 3 car monte I've been playing. Turns out I was right about the Ella - she was fuel starved. After a new low-pressure fuel pump (they have 2!) and a couple of filters (yeah, 2 of them too), she's running great. Hapy is back on the road, but curbside while I decide what to do with him, and I'm hoping that sheer numbers (or one person's clarity) can help guide me.

The decision: replace Hapy's stock 1700 engine with
1) keep the limper
2) a Raby Camper Special
3) the TDI engine I have on my garage floor
4) a BusDepot special
5) some used engine off of craigslist
6) build one from parts collected off the 'net, parts stores, etc

Each have their own positives and negatives, and I'll try to detail them here. Part of the equation is how much time it will take to get road-ready, how reliable the finished product will be, how powerful Hapy will be in the short and long run, etc. This all makes it really hard to be sure of what the right answer is. I'll spread descriptions of the different choices across multiple posts so this one doesn't get ridiculous. Depending on how it goes, I'll either post a grid of pluses and minuses or a summary or something like that. Anyway, I'll start with choice #1: do nothing, and go from there.

1) Keep the limper
Doing nothing is always a choice, but for how long? Will Hapy run indefinitely with the frankenmotor he currently has? Of course not. The trick is guessing when he's going to die and save up for that inevitability or be proactive. This choice is basically saying "let's wait until later when everything is more expensive".
Figure, he has 68HP if we're lucky. On most drives up Mt. Hood I get waved at one finger at a time. Ever wonder where that rushhour slowdown on I-5 South came from? That was me, driving home from work up the hill out of downtown in the righthand lane at 40MPH. Maybe only drivers of other slow vehicles can really understand the stress this brings when you're supposed to be enjoying the drive. The limper engine is also one of the main reasons our routes take us on state routes instead of interstates. Did I mention the MPG? 16. bleck. If I keep the limper, I'll need to at least slap fuel injection on there. That should improve the MPG by a couple, but it doesn't address the time-bomb effect, nor does it improve the boost uphill by much. Also, there is still the time spent getting the fuel injection on.

Choice summary ranking as compared to other choices (1st, 2nd, etc):
cost (1-6): 1st
work (1-6): 1st
power(1-6): 6th
mpg (1-6): 6th
reliable (1-6): 4th

next time... the Raby Camper Special

Added after all posts completed:
Since I can't figure out a grid, here are the rankings by category (1->6)
Cost: limper, used, collect parts, BusDepot, Raby, TDI
Work: limper, used, BusDepot, Raby, collect parts, TDI
Power: Raby, TDI, BusDepot, collect parts, used, limper
mpg: TDI, Raby, BusDepot, used, collect parts, limper
reliable: Raby, BusDepot, TDI, limper, used, collect parts

Wednesday, March 14, 2007

Clutch Cable Conundrum

I haven't given a great deal of background on our other cars, but now is as good a time as any. This is relevant, eventually. We have a Jetta TDI that we call Flash. We've had him for a few years, and now that the intake has been cleaned, he lives up to his namesake again. Although we originally bought him as a work-commuter car, its been the fam-transporter for the last year. A few days ago, we bought an '85 Mercedes 300TD turbo-diesel wagon that we call Ella. This is the new fam-transporter, that should move Flash back into a commuter car and move Hapy back into a Summer-only funbus. That was how we started the day yesterday, but things got interesting by nightfall.

First, something happened to Ella and she wouldn't start. I had to beat feet home from work so the kids could make their after school events. Ella sounds like she's fuel-starved, but I don't have a filter or anything for this car. So it sat overnight and went off to the shop this morning on the back of a towtruck.

Second, I noticed when I drove Flash last night after the kids got home that the check engine light was on. He ran fine, so I'm thinking its something minor, but I'd like to run the codes just the same. Anyway, with Ella in the shop, the wife and kids get Flash today, and Hapy needed to be the commuter car for one more day. Apparently, that was one day more than he wanted to be a commuter car. Which leads us to "third"...

On the drive into work this morning, Hapy's clutch cable broke. I fully admit, I knew it was on borrowed time. I had recently adjusted the cable and I had practically run out of threading. This told me that the cable was stretching, which only happens at the beginning and the end of a cable's useful life. Since I knew it wasn't new, I knew it was dying. I made a note of it and promised Hapy that I'd deal with it after he was allowed to rest (not commuting every day). I guess Hapy thought I went back on our deal. So, in less than 24 hours all 3 of our cars went from trouble-free to troublesome.

Hapy's first tell was when I clutched to shift into 4th during the morning rush hour and felt a little "doink" through my foot. I knew something wasn't quite right. My first thought turned out to be the right one: the clutch cable snapped, but the pedal didn't drop to the floor, so I was a little unsure. Fortunately, traffic was moving at a pretty steady pace through the Terwilliger curves on I-5, so I was able to stay with it from the Terwilliger on-ramp through to the OR26 offramp. At this point, traffic started to gum up so I took the exit and turned onto a side street. I only clutched once and that was just to get out of 4th so I could coast. This may have saved the rest of the cable and, more importantly, the wingnut on the end.

I was pretty angry at myself for not having kept my promise to Hapy, and the whole vehicular nightmare that we were living: 2 cars down, 1 unknown. After cursing for a minute or so, I climbed into the back of the bus and checked under the rear benchseat for a new cable. Ahh... I had one. I remembered buying it a long time ago "just in case", but I wasn't sure if it was in the bus where it should have been or in the garage. Carry an extra clutch cable, wingnut and clevis pin. I had to reuse the clevis pin, but if the wingnut had been lost, I would have been too - I had no spare.

Now comes the fun part: getting out of my docker-world monkey-suit and into my coveralls to see what's what. There's something very surreal about stripping down inside your bus while the morning commute rushes past the windows. What I don't realize when I'm driving with them is that no one ever looks out their side windows except to check the blindspot. I'm practically naked with the curtains spread wide and I didn't get a single look. Funny.

Anyway, I had my bag of books so I opened the Muir book to the clutch cable replacement section. Turns out he's completely wrong for buses after 1968. I realized this after removing the front belly pan only to discover that I couldn't get to the front of the clutch cable from there. Grr... If you ever need to replace
your cable, the Bentley chapter 5, section 15.5 is right. I was able to pull the old cable out and inspect it for wear. There was an old fray about 2 feet from the end and the end itself was split in 2. Fortunately, the tail of the cable was still there, connected to the clutch arm and the wingnut was still attached. I think if I had gone to town on the clutch pedal trying to will it to work, I would not have been so lucky. I greased the snot out of that new cable while I slid it in from the front. The front end of the tube into which the cable is supposed to feed can be hard to spot if you aren't sure where to look, so make a note of it before you pull the old one out. I could have saved myself a few minutes if I had.

The whole process, from the "doink" feeling in my left foot to pulling back onto the interstate was less than 2 hours. If I had to do it again, I could probably half that time. Regardless, as always seems to happen, every time I do a small repair on the bus, I get that satisfaction feeling of having been self-sufficient again. In
contrast, Ella has been at the shop all morning and we have yet to find out what's wrong. I think it would be terribly ironic if it was the fuel filter. This would just further prove that while doing your own diagnosis and work is important, having the part immediately available is more so. I guess I need to start making a list of Mercedes parts to have around.

until next time...

Tuesday, March 13, 2007

AirCooled AfterMarket Axis of Evil (Part III)

It seems like there are 3 different things that all get changed around the same time by folks that mean well, but don't realize they're doing their air-cooled VW a disservice. Maybe they got misled by some flashy advertisement. Maybe they were talked into it by a mechanic that "used to race" so he knew what he was doing. Regardless, if you find one of these aftermarket modifications, the odds are very good that the other 2 have been made as well. This is part III of a 3 part series dedicated to the different AirCooled Aftermarket Axis of Evil modifications. So, if the other 2 were Iraq and Iran, then this one must be my North Korea.

Evil Aftermarket Modification #3: removing the thermostat or more of the temperature regulation system
I've never really understood why people do this, but it happens so often, it has become a practice. Kind of like selling nuclear equipment or materials to non-proliferation countries, this will only come back to haunt you. Eventually. We call these engines "air cooled" which sounds like they're always hot and need cold air blowing on them all the time or they'll melt in front of your eyes. While this is true when you're running through the desert in mid-afternoon in August, most of us aren't doing that. Ever. So why should you care? Your heads can warp if you blow cold air on them when they are not in need of cooling, for one thing. For another, your fuel won't burn properly, driving down your power and your mpg. A thermostat and the air vanes help the engine get to its most efficient temperature, and then helps keep both the oil and the engine at that temperature. "The oil?" you ask. Yeah, the oil. Although we call these "air cooled" John Muir pointed out that we should probably call them "oil cooled" as well because its the oil that transfers a lot of the combustion temperature out. If you don't have the air vanes, you aren't getting air to your oil cooler, and you're heading for an overheating.

How do I recognize this evil?
This evil comes in 2 forms-
First: no thermostat. Get on the ground behind your bus with a flashlight and shine the beam through the exhaust above the lower right-side engine tin so you're looking between the right heat exchanger (manifold) and the block. Is there a cable running from the front end back to a pulley and then up to the top of the engine? No? Someone took your thermostat off and didn't replace it.
Second: no vanes. Open the rear engine door and reach over the top of the fan housing (the big silver thing on the very back of the engine). Is there a bar there that runs the length of the back of the housing? No? They got your vanes too! It is very rare that you'll have lost your vanes but kept your thermostat. This is because the thermostat has a cable running from it to control those vanes, and removing the vanes is much more time consuming than pulling the thermostat plus cable. As much as the removal of the thermostat irritates me, the removal of the vanes is just hazardous to your engine. This needs to be remedied. While you're at it, put a thermostat on there.

How do I eradicate the evil-doer(s)?
If all you're missing is the thermostat, you can no longer get the original styled part. Maybe this is why the old one didn't get replaced. Nah... You can get a newer version type1 thermostat and have it altered to suit a type4 (pancake) engine. I had the fine folks at aircooled.net do this for me and it bolts right in. Tie a small fishing weight to a length of string. Tie the other end to the vane rod and drop the weight through the tin-hole in the top of the engine just to the left of the right-side of the fan housing. If you use a flashlight and a mirror (or stick your head in there) its pretty easy to see that there's only the one hole. Tape the cable end to the string and pull the cable up through the hole. Push the rod all the way forward and thumbscrew the cable to the rod. Wait, you don't have a rod?! Then we need to fix that first.
Replacing the vanes and actuating rod takes a little more time and requires some used parts (theBusCo.com is my personal playground for stuff like this). Its actually easier to do this by dropping the engine, but if you don't want to do that (like I didn't), follow these instructions. You need to remove the exhaust (from the heat exchangers back), and the rear engine tin. Do you have a heat reflector between the muffler and the lower engine tin? No? Yeah, that's not surprising. As long as you're there, you should find and install one of these. It will drop your engine temperatures a few degrees when the engine is running it’s warmest - when you want the temp drop. Anyway, remove the alternator tin (leave the alternator there, though), and remove the fan grill, timing scale and fan. Remove the little tins (covers) between the heat exchangers and the fan housing. There's one on each side and they're about 3 inches by 1 inch and held in by 2 flathead bolts each. If you have the little flappers in there, grab them. If you don't, add them to the list for the used bus parts place. Now, for the heavy part: support the fan housing with something and remove the bolts (in the hole where the fan was) that hold the fan housing to the engine block. You'll probably discover a few flathead screws that you didn't take out holding you up. Pull them and wiggle the fan housing back. There is just enough space to fit the new-to-you vanes into the fan housing. Make sure the bottom of the vanes click into the little hinge pins or they won't operate correctly. Hold the rod steady and fit the housing back into place. Test the action of the rod. No scraping noise? They move freely and make a clatter-clunk noise at each end of travel? You're good! Put those big bolts back in and take a breath. The install is genuinely the reverse of the install. Don't forget to put the little flaps in where the heat exchangers meet the fan housing, and cut a gasket for the little covers when you put them on. Put the fan on squarely and torque it down in steps, don't forget your timing scale. Make sure you place the gasket between the alternator and its tin properly. When you're ready to put your rear engine tin back on, get your heat reflector ready - it is held on by the same flathead bolts. Its recommended to use new fasteners and gaskets when you put your exhaust together. I use stainless steel bolts, washers and nuts whenever I can so I can reuse them. And they don't rust.

I think somewhere along the line someone in Southern California or in the desert states came up with a few hot-rodder ideas that worked in their area. Everywhere else we have dew points, stop signs and morning chill that we have to think about when tooling on these buses. Once you've removed these 3 demons from your bus you will notice that it runs better in all kinds of weather, has better power and gets better mileage.

Monday, March 5, 2007

AirCooled Aftermarket Axis of Evil (Part II)

It seems like there are 3 different things that all get changed around the same time by folks that mean well, but don't realize they're doing their air-cooled VW a disservice. Maybe they got misled by some flashy advertisement. Maybe they were talked into it by a mechanic that "used to race" so he knew what he was doing. Regardless, if you find one of these aftermarket modifications, the odds are very good that the other 2 have been made as well. This is part II of a 3 part series dedicated to the different AirCooled Aftermarket Axis of Evil modifications.

Evil Aftermarket Modification #2: 009 distributor (010 and 050 too)
Some folks still swear by them. I swear at them. John Muir said the mechanical advance distributor was better than the vacuum/mechanical because the introduction of the vacuum was really for lazy people. Well.... I'd have to disagree. If you have one of these distributors, you probably find that you have almost no power at the very bottom of the RPM range. Pulling away from a stop sign requires that you really goose the gas. If you've always had a mechanical-only advance distributor (009, 010, 050) you may not realize the this is not how a VW is supposed to run. The vacuum is needed because the mechanical advance is too slow at the beginning of the curve, causing the bog-down effect from a full stop.

How do I recognize this evil?
There will not be a vaccum can on the side. The vacuum can is a circular brass thing (looks almost like a hockey puck) stuck to the side of the distributor near the top where the cap clicks on. Its about 2 inches across and has a little hose coming out of it that connects to your carb or fuel injection somewhere. Some distributors have a vacuum retard as well so there may be more than one hose. The important part is that you have a hose going from the distributor to something else. A 009, 010, and 050 have no hose, just wires... and bad times.

How do I eradicate the evil-doer?
Simply, toss it in a box and get a distributor with a vacuum advance component. Don't sell it or the terrorists win! Your local steel recycler is your ally! There are aftermarket replacement distributors that have a vacuum component. For example, I got a SVDA (Single Vacuum Dual Advance) from aircooled.net for about $150. You can get the stock distributor, but I've found them to be more expensive. The stock part number is 021905271 with a letter on the end that differs depending on your model year. You can find these new at BusDepot or used at theBusCo, BustedBus or Bus-Boys. Installing a distributor isn't as hard as it sounds. Just get your engine to top-dead-center (TDC) - that's where your engine is ready to fire in cylinder #1. Remove the old distributor and put the new one in. The guys at AirCooled.net supplied many pages of instructions, so this was a short afternoon's work to get it into my bus and running right. If you go the stock distributor route, there are decent instructions in the Bentley service manual for installing it. I took this opportunity to switch from points to electronic ignition. It cost $70 for the kit and an additional $10 for the labor at AirCooled to put it into the SVDA, but I like the fact that I don't have to mess with points when I do a tune up. Besides, I think the electronic ignition gives a better spark.

How to set the timing once the distributor has been installed has been a topic of great debate. I have found that setting the timing just retarded from the spec for the engine code has been the best for me. Advance too far, and you overheat. Overheat, and you're walkin'. Every bus has a different combination of parts if you aren't strict-stock, so your timing may not be exactly by-the-book either. Static timing of an 009 is practically impossible, so by removing this evil, you're actually making your bus more owner-maintainable. I've carried my old 009 around in my parts bin (the big cabinet under the Westfalia rock-n-roll bed) for 2 years just in case I needed it. I don't need it anymore, but selling the 009 is spreading the wrong message (letting the terrorists win), so its going to the steel recycler. Maybe, though the wonders of recycling, it can become an instrument of freedom.

Next time.... Evil AfterMarket Modification #3

Friday, March 2, 2007

AirCooled Aftermarket Axis of Evil

Yesterday's posting about the Weber Progressive Carb in the Wintertime reminded me of my AirCooled Aftermarket Axis of Evil. What is this Axis of Evil? Well, its not Korea, Iran and Iraq. It is a collection of modifications performed on aircooled vehicles that are all done together for some reason. It seems like there are 3 different things that all get changed around the same time by folks that mean well, but don't realize they're doing their air-cooled VW a disservice. Maybe they got misled by some flashy advertisement. Maybe they were talked into it by a mechanic that "used to race" so "he knew what he was doing". Regardless, if you find one of these aftermarket modifications, the odds are very good that the other 2 have been made as well. Bear in mind, if the VW engineers could have left off a bolt, they would have saved the company a big ol' pile o' cash after producing millions of these engines.
I'll spend my next 3 posts on each of the different AirCooled Aftermarket Axil of Evil modifications. After yesterday's post about the Weber 32/36 progressive, we'll logically start there. Its not the worst of the Axis of Evil, but its not part of the Coalition of the Willing either.

Evil Aftermarket Modification #1: Weber Progressive 32/36 Carb.
I know fellow bus drivers that swear by these carbs. Usually it comes up in a conversation about why they only drive their bus in the Summertime. "Busses can't be used all year 'round," they say. "They don't like the cold." Ahh yes... good old balmy Germany... that's where my bus wants to drive. That's crazy talk. If you don't like driving your bus in the cold because it doesn't have heat, say so, and I'll happily help you fix it. Your bus likes the cold fine. Your centermount progressive carb doesn't. It really isn't the carb's fault, though, its the fault of the long intake that the carb sits on. After the fuel and air mix together, it travels down 15" or more of pipe to the intake port on your head. That pipe is out there in the elements, not heated by anything, so the fuel mixture gets all dorked up and by the time it hits the combustion chamber it doesn't burn right. This carb was designed to sit right on top of the Pinto engine, getting warmed by the engine block. No such luck on theVW, especially the pancake motor in 1972-1983 bus/vans.

How do I recognize this evil?
When you pop the rear engine door and look inside, there will be a silver squarish thing sitting right in the middle of everything. If it is exactly as it comes out of the box, it will have a chrome aircleaner on it. It is sitting on long silver tubes that look like electical conduit. "Aw.. but it looks so pretty," you say. Yeah, pretty, but grossly inefficient when the air temperature drops below 70F or gets near the dew point. Here in the Pacific NorthWest, its a rare day when its not near the dew point except in the Summer..... which, oddly enough, is when the local Weber drivers think is the only time to drive a bus. Coincidence? No, they've been confused by the evil-doers.

How do I eradicate the evil-doer?
There are a few options for reducing the negatives of the Weber (containment of the evil-doer), or you could toss it completely for the correct induction system for your make/model/year.
Option 1: you could add insult to injury by trying the GM Cavalier trick. The Cavalier had a similar problem with its induction system, so GM added a heated gasket to warm the system. Whaddaya know, it fits between a Weber and that ridiculous electrical conduit intake. I have not personally done this, but I have heard that this does actually work, but you need some kind of thermal sensor to tell it to turn itself off. Sounded dangerous and little like like nonscience, so I tried...
Option 2: find a source of warm air and route it into the aircleaner. This helps the carb work better down to the mid 40F's, and drivable into the mid 30F's. I went into more detail in yesterday's post about this. The best solution is replacing the whole thing with what was removed in the first place - either dual carbs or fuel injection. These are more expensive options, but doing it right isn't usually the less expensive way in the short term. It is usually the less expensive way in the long term, though.

Dual carbs and fuel injection are not harder to dial-in than the Weber, nor are they harder to routinely maintain. What's hard is finding what's wrong with the used parts you have. Run a Weber for 30 years, and see if you don't have a similar "what's wrong with it" head-scratching session. The Dual carbs and fuel injection that came with the bus have 30 years of millions of owners experience to draw on. Removing the evil-doer in this case is easy; its the establishment of a stable system after the fact that's the challenge. That's usually because you're doing the work with the parts you have, not the parts you wish you could have. Hmm.. that sounded eerily familiar.....

Next time... Evil Aftermarket Modification #2

Thursday, March 1, 2007

Cold Weather and the Dreaded Weber

The Pacific NorthWest has been experiencing its last throes of Winter these last few weeks. Ever since Puxatawney Phil didn't see his shadow, it seems like the weather gods have decided to prove him wrong: there will be more winter. Here in the Pacific NorthWest, we've had "wintery mix" which means rain, freezing rain, sleet, hail and snow shifting from one to the other throughout the day. Did I mention gusting wind? Oi. It makes driving a little more exciting, but traffic a real bear.

When the air gets this cold, it takes a long time for Hapy to warm up. When I first bought Hapy, he was missing a number of pieces that helped to keep him warm - making his warmup never complete in winter. I'll go into those part identification and installation adventures another day. Even after finding and installing all those parts, though, the non-stock Weber Progressive 32/36 carburator would not perform well in the cold. If the air temp fell below 50F degrees, he would buck and toss like when I first learned how to drive a clutch. If you're having the same experience, I'd suggest you try this:

First, find a snorkelled air cleaner that fits the top of the Weber 32/36. I bought a "Sprint" air cleaner from Pierce Manifolds for $15. This fits perfectly on top, and bolts down with the filister bolts you use on the chrome air cleaner the Weber came with. This will allow you to control warm and cold air entering the carb.
But where does the warm air come from? Look at the right side of the firewall when looking in through the access hatch (top or rear). Is there a steel elbow that points up that's maybe 2 inches across? No? Is there a square hole with 2 bolt holes on either side of it? Yes? Ok, you're missing 2 key pieces of tin for getting the warm air into your carb. Now, if you have a fuel injection (FI) firewall, you may not have either of these items, so you may have more tin to replace. Honestly, if you have to go that far, you may want to consider returning to FI. Anyway, the pieces are on this diagram, numbers 42 and 43. Number 42 is the elbow on the inside of the firewall and #43 is a longer elbow that bends around the fuel pump (if you have a mechanical fuel pump) and to the firewall. I got these 2 pieces from my man Ken at theBusCo.
Getting these pieces to align without dropping the engine is a challenge, especially if you have a mechanical fuel pump, as the longer elbow needs to fit between the fuel pump and some of the engine tin. You do have a hole in the tin where the long elbow comes down, right? No? Ok, you have newer tin so you can either buy a "new" piece or cut your old one. I cut mine and I now regret it as I have to plug the hole to put FI back on. All of the pieces do fit together, and it can be done by yourself, but its much easier if you can get a friend or a willing child to hold the small elbow in place as you thread the filister bolt through and tighten it down. When its raining, and you're working in your driveway (as I was), you really appreciate hot tea afterwards... and a long shower.
After the tin is in place, and the snorkel is attached, you've finished the hard part. You need a flexible air hose to connect the small elbow near the firewall to the lower part of the snorkel. I got a standard sized one at the local GI Joes. Route the air hose under the long intake runners so its out of the way and any residual heat will warm the runners a little.

To make use of the new equipment, lift the flapper on the snorkel all the way. This will bring just the warmed air up into the carb. In Summer, lower and click-shut the flapper so only cool air enters the carb. This is important as in the Summer using only warm air can overheat your engine. Also, you get better power with cold air entering the carb, so you may want to play with where you set the flapper. You should find that by using the snorkel, you can drive your bus down into the 30F temps before you have the bucking return.

This Winter, especially these last few weeks, I have driven my bus in 35F temps uphill on the interstate. I have had to stay in the right-hand lane, but I've been able to stay on the road. Two years ago, that would not have been possible. If you're having troubles with your Weber and either can't afford to get FI ($250) or don't want the hassle of working on a FI powered engine, you can get the tin, snorkel and the hose for under $50 and a couple hours work. Just try to find a dry place to do the work.